Tuesday, February 16, 2016

SUO142 Trust In The Lord


Hi Friends!   

It’s time for the SUO142 “Stampin' Up! Sale-A-Bration 2016” Challenge (Sale-A-Bration (SAB), an annual Stampin’ Up! promotion that allows you to choose one item from the SAB Catalog for every $50 in sales).  We want to see what you have created with this year's SAB Products :-)

I decided to use two SAB items on my card, the What I Love photopolymer stamp set along with the Botanical Gardens Designer 6x6 Vellum Pack.

This card also incorporates the Pals Paper Arts PPA284 ColorChallenge and the #TGIF42 Sketch Challenge (I flipped the sketch to the right to use the design in a portrait orientation :-)).    

I hope you will have a chance to check out my sister Design Team member samples at the SU-Only Challenge site as well as the fantastic Design Team samples and galleries at the other two challenge sites- gorgeous inspiration from all!

To create this card:

Use the Big Shot™ with the Woodgrain Textured Impressions™ Embossing Folder to emboss a piece of Lost Lagoon cardstock. Trim the panel and mount onto the Calypso Coral card base.

Use a sewing machine with a zig zag stitch to adhere a piece of the Botanical Gardens Vellum to a piece of Old Olive cardstock and mount onto the lower portion of the card front.

De-static another piece of the Botanical Gardens Vellum with the Embossing Buddy®, ink the floral image from What I Love with Versamark™ Ink and stamp onto the printed side of the vellum.  Apply White Stampin’ Emboss® Embossing Powder and heat set with the Heat Tool.

Create a mask for the flower image with a sticky note, mask the flower and repeat the steps above to stamp two more flowers and three stems.

Once the embossing powder has cooled (only a few seconds), flip the stamped vellum panel over and color the images from behind using Stampin’ Write Markers- Calypso Coral for the flowers and Old Olive for the stems.

I curved the center of the stamped panel
by adding an additional layer of Stampin’ Dimensionals®
so the sentiment could be pressed against
vellum :-)
Ink the sentiment from Trust God using Stāz-On® Jet Black Ink and stamp onto a piece of Whisper White cardstock.

Adhere the stamped Vellum panel to the Whisper White panel with the zig zag stitch, mount onto Lost Lagoon cardstock and ad the 3/8” Lost Lagoon Silky Taffeta Ribbon strip and triple bow to the corners.

Add a White Tea Lace Doily behind the panel and mount to the card front using Stampin’ Dimensionals®.

Add a few Pearls to finish off the card.

Stamp Sets:  What I Love (2016 SAB), Trust God

Ink:  Versamark™, Stāz-On® Jet Black; Stampin’ Write Markers- Calypso Coral, Old Olive
Paper/Cardstock: Whisper White, Calypso Coral, Lost Lagoon, Old Olive; Botanical Blossoms Vellum (2016 SAB)
Accessories: Big Shot™, Woodgrain Textured Impressions™ Embossing Folder, Embossing Buddy®, Stampin’ Emboss® White Embossing Powder, Heat Tool, Sewing Machine, White Thread, White Tea Lace Doily, Pearls, retired 3/8” Lost Lagoon Silky Taffeta Ribbon

Thanks again for stopping by and we hope to see your Stampin’ Up! Only project in our “Stampin' Up! Sale-A-Bration 2016” Challenge gallery!

Monday, February 15, 2016

Psalm 129:8- The Blessings of the Lord


Hi Friends!

I hope all of you had a fun Valentine’s Day weekend!  I was able to spend a bit of time designing cards this weekend for a few of my Design Team challenges (will be sharing these later this week) but I also was able to create a card using the Our Daily Bread Designs "Shining the Light" ODBDSLC270 Sketch Challenge along with the Splitcoaststampers’ (SCS) CC569 Color Challenge and the Just Add Ink  JAI298"Just Add V" Challenge (Verse for the sentiment).


If you have not done so already, I hope you will find the time to check out the Design Team samples and gorgeous gallery at Our Daily Bread Designs (ODBD) as well as the SCS and Just Add Ink galleries-  fabulous inspiration from all!

This card was very easy to create:

Ink the Quilts (ODBD) stamp image using Stāz-On® Jet Black ink and stamp onto Whisper White cardstock.

Use an AquaPainter™ to apply ink from Stampin’ Write Markers- Lost Lagoon, Old Olive and Watermelon Wonder to the quilt square and once dry, apply Clear Wink of Stella® to a few areas (this is difficult to see in the photo), fussy-cut the quilt square and layer onto a piece of Lost Lagoon cardstock.

Use the Big Shot™ with the ODBD Double Stitched Circle Dies to cut out a circle and the ODBD Pennants Dies to cut out (and emboss the pennant) from Watermelon Wonder cardstock and the Layered Lacey Squares Die to cut out a piece from Whisper White cardstock.

Ink the ODBD Chalkboard Vine Background stamp with Watermelon Wonder Classic Ink and stamp off once before stamping onto the Double Stitched Circle die cut and Pennant Die Cut.

Emboss a piece of retired Old Olive Designer Series Paper with the retired Square Lattice Textured Impressions™ Embossing Folder, use a zig zag stitch with white thread to attach it to a piece of Lost Lagoon cardstock, trim and mount onto the Watermelon Wonder card base.

Cut the Pennant Die cut (to split the die) and mount the Pennant Die cut along with the Layered Lacey Square die cut onto the card front.

Mount the Quilts image on a diagonal onto the Double Stitched Circle die cut and add the layered image the card front using dimensional foam.

Stamp the verse from the ODBD Doily Blessings stamp set with Stāz-On® Jet Black ink, stamp onto Whisper White cardstock and die cut with the ODBD Double Stitched Circle Dies.

Layer the die cut sentiment onto a piece of Lost Lagoon cardstock (also die cut with the same size ODBD Double Stitched Circle Die) and mount onto the card front with dimensional foam.

Add the Lost Lagoon 3/8” Stitched Satin Triple Bow with Pearls to finish off the card.

Stamp Sets: Quilts, Chalkboard Vine Background, Doily Blessings (all ODBD)

Ink: Stāz-On® Jet Black, Watermelon Wonder; Stampin’ Write Markers- Lost Lagoon, Old Olive, Watermelon Wonder

Paper: Whisper White, Lost Lagoon, Watermelon Wonder, retired Old Olive DSP

Accessories: Big Shot™,  ODBD Dies- Layered Lacey Squares, Double Stitched Circles, Pennant; retired Square Lattice Textured Impressions™ Embossing Folder, 3/8” Lost Lagoon Stitched Satin Ribbon, Pearls, Sewing Machine, White Thread, AquaPainter™, Clear Wink of Stella®


Thanks again for taking the time to visit- hugs and have a blessed week, my friends!

Monday, February 8, 2016

SC122 Love You


Hi Friends!!

Woohoo!! I am a Guest Designer for the Stampin’ Celebration SC122 Photo Inspiration Challenge and I decided to create a Mixed Media card using the colors and the heart theme.


I hope you have a chance to visit the gallery at Stampin’ Celebration and check out the rest of the Design Team samples as well as the designs from the other two challenge sites- fabulous inspiration from all!

To create this card:

Apply Gesso® to a piece of Whisper White cardstock (I used a piece of Whisper White cardstock that I had printed some Scripture from Psalms and decided that I was unhappy with my Bible Journaling on that page, so I cut the paper into A2 size panels and this is one of those panels).

Once the gesso has dried, apply Gelatos®- I used a blue metallic, light blue and metallic pink (sorry, the colors were not printed on the outside and I neglected to note them before discarding the packaging- oops!).   

Spread the Gelatos® with your finger (I used a dry paper towel), spritz with water and allow the colors to merge and drip down the paper. 

Dab the colors with a paper towel, re-apply, spritz again and dry with the Heat Tool. 

Add Ranger® Tim Holtz® Worn Lipstick Distress Stain, spritz and dry with the Heat Tool.

Once you are satisfied with the color (I ended up doing several layers), use a Sponge Dauber to apply Melon Mambo Classic Ink over the Memory Box™ Texture Flourish Stencil, trim the panel, mount onto a piece of Melon Mambo cardstock, trim again and mount onto the Whisper White card base.

Here is the background before adding the die cut heart :-)
Adhere a strip of Basic Black cardstock across the upper portion of the panel, add the Basic Black paper bow and Antique Brad.

Use the Big Shot™ with the Bloomin’ Heart Thinlits™ (Stampin’ Up!) to cut a heart from Whisper White cardstock and a few of the flowers from Melon Mambo cardstock.

Also, from the Bloomin’ Heart Thinlits ™ cut two of the large flowers and three of the smaller flowers from Whisper White cardstock.

Mount the Whisper White Bloomin’ Heart die cut to the card front with Stampin’ Dimensionals® and add the Melon Mambo flowers to the Bloomin’ Heart die with with Stampin’ Dimensionals® as well.
 Add Pearls for the centers of the flowers and the heat embossed sentiment banner to finish off the card.

Stamp Sets: Express Yourself (retired Stampin’ Up! Hostess Set)

Ink: Versamark™, Melon Mambo; Ranger® Tim Holtz® Worn Lipstick Distress Stain; Gelatos®

Paper: Whisper White, Basic Black, Melon Mambo

Accessories: Gesso®, Big Shot™,  Bloomin’ Heart Thinlits™, Texture Flourish Stencil (MB), Pearls, Punches-Bow Builder,  Hexagon; Embossing Buddy®, Stampin’ Emboss® Winter White Embossing Powder (retired), Heat Tool

Thanks again for taking the time to visit- I hope you can gather your supplies and join us at the Stampin’ Celebration SC122 Photo Inspiration Challenge!

Sunday, February 7, 2016

Puppy Love :-)

 Hello Friends!

I decided to join in on the Splitcoaststampers Cards for A Cause this year and the February Challenge is to send cards to the Tri-County Humane Society in St. Cloud, MN (see details here).

I knew that the Puppy Love set from Sweet ‘n Sassy Stamps would be perfect for this cause and I also noticed that this week, The Paper Players PP281 Theme Challenge is “Raining Cats and Dogs” :-)

I have also linked this card to the Splitcoaststampers’ CC565 Color Challenge and the SC578 Sketch Challenge.

I hope you will find time to visit the above galleries and if you are inclined to do so, come join in on the Cards for A Cause card drive (this is a monthly card drive with a different cause each month- last year Splitcoaststampers sent over 6300+ cards to worthy causes- wow, what an honor to be part of that this year :-)).

To create this card:

Ink the Scottish Terrior dog image and the sentiment from the Puppy Love clear stamp set from Sweet ‘n Sassy Stamps (SNSS) using Stampin’ Up! Black Archival Ink and stamp onto Whisper White cardstock (I used my MISTI® Tool for alignment and repeated stamping to get the images nice and dark and I also used the Heat Tool to speed up the drying time for the multiple layers of ink).

Add a few paw prints from the Puppy Love set using Smoky Slate Classic Ink, trim the panel and use a sewing machine with a zig zag stitch to adhere it to a piece of Basic Black cardstock.

Emboss a piece of Real Red designer paper (retired years ago from a Stampin’ Up! hostess pack), adhere to Basic Black cardstock using the zig zag stitch as well.

Layer the background panel onto Real Red cardstock, add the panel onto the Whisper White card base and mount the horizontal embossed/ stitched panel directly to the card front.

Stitch two flag banners to the upper left corner with a straight stitch and mount the focal image panel with dimensional foam to finish off the card.

Fun and quick- this card should be flat enough to mail without additional postage.
Puppy Love 

Stamp Sets:  Puppy Love (SNSS)

Ink: Black Archival (Stampin’ Up!)

Paper: Whisper White, Basic Black, retired Real Red DSP (Stampin’ Up! hostess level I set)

Accessories:  MISTI® Tool, Big Shot™, Sizzix Plaid  and DiamondsTextured Impressions™ Embossing Folders,  Sewing Machine, White Thread, Hexagon Punch


Thanks again for taking the time to visit- hugs and have a blessed week, my friends!

Saturday, February 6, 2016

Mojo337 Purr-fect Thank You :-)


Hi Friends!

I am working on a few pet themed cards for a card drive at Splitcoaststampers and decided to use the Mojo337 Sketch for the layout.

I love this sketch- it was fun to work with and you should see all of the gorgeous examples in their gallery!

Bermuda Bay is another color that seems a bit difficult to photograph- it
is not as bright blue/turquoise as it appears here :-)
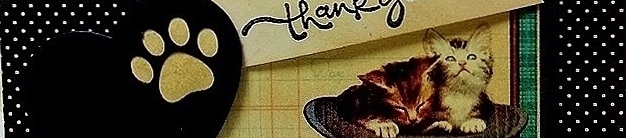
To create this card-  emboss a piece of Bermuda Bay cardstock with the Darice® Paw Print Background Embossing Folder, trim and mount onto Basic Black cardstock, add the Graphic45® Raining Cats and Dogs designer paper to the stitched Basic Black frame, add the strip of polka dot paper along with the framed designer paper, sentiment and paw print heart and you are finished!

Stamp Sets: Short & Sweet (retired Stampin’ Up!)

Ink: Stāz-On® Jet Black, Ranger® Tim Holtz® Old Paper Distress Ink

Paper: Very Vanilla, Basic Black, Bermuda Bay; Graphic45® Raining Cats and Dogs

Accessories: Big Shot™, Darice® Paw Prints Background Embossing Folder, My Favorite Things© (MFT) Pet Accents Dies,  MFT Blueprints 20 Die, Hexagon Punch


Thanks again for taking the time to stop by- hugs and have a great week, my friends!

Wednesday, February 3, 2016

TCC48 Mixed Media Love You


Hi Friends!!

It’s time for new The Card Concept #TCC48 "Sweet Hearts" Challenge!    Isn’t this a gorgeous collection of heart cookies- too pretty to eat for sure!  


I hope you have a chance to visit us at The Card Concept and check out the rest of our Design Team samples as well as the other challenge sites- fabulous inspiration from all!

Just a reminder that the Card Concept is a bi-weekly challenge that has an inspiration photo along with a number of design styles that you can choose from to create your card- Clean and Simple, Clean and Graphic, Clean and Layered, Shabby Chic, Freestyle Collage, Classy and Elegant and Mixed Media.  

To create this card:

Apply Clear Gesso® to a piece of Whisper White cardstock (I used a piece of Whisper White cardstock that I had printed some Scripture from Psalms and decided that I was unhappy with my Bible Journaling on that page, so I cut the paper into A2 size panels and used one of those panels for this project).

Once the gesso has dried, apply Titanium White Acrylic Paint over the surface, add a bit of pink and melon Gelatos® along with Ranger® Tim Holtz® Worn Lipstick and Festive Berries Distress Stains, allowing the stains to merge with the Gelatos® and dry with a Heat Tool.

Place the Memory Box™ Pattern Heartwood Stencil over the panel, use a dampened paper towel to remove some of the ink and dry with the Heat Tool.

Ink the splatter stamp from Timeless Textures (Stampin’ Up!) using Rose Red Classic Ink and stamp over the surface.

Trim the panel and mount onto a piece of Crumb Cake cardstock, trim the Crumb Cake layer and mount onto Whisper White cardstock.

Adhere a strip of Whisper White cardstock mounted onto Rose Red cardstock across the upper portion of the panel, add the 5/8” Satin Ribbon  and adhere the ends of the ribbon behind the panel.

Mount the entire panel onto a piece of Rose Red cardstock, trim and mount onto the Whisper White card base.

Use the Big Shot™ with the Bloomin’ Heart Thinlits™ (Stampin’ Up!) to cut a heart from Whisper White cardstock and one from Rose Red cardstock.

Also, from the Bloomin’ Heart Thinlits ™ cut two of the large flowers and three of the smaller flowers from Whisper White cardstock.
Mount the Rose Red Bloomin’ Heart die cut directly to the card front and add the White Bloomin’ Heart die cut with Stampin’ Dimensionals®, offsetting the die cut a bit to show the Rose Red layer.

Add the white flowers to the Bloomin’ Heart die along with Pearls for the centers and a row of Pearls in the center of the Satin Ribbon.

Stamp the sentiment from Short & Sweet (retired Stampin’ Up!) with Early Espresso Classic Ink onto Whisper White cardstock, create the banner using the Hexagon Punch and mount onto Rose Red cardstock (also punching the ends with the Hexagon Punch).

Add the sentiment to the card front (tucking under the flowers) using Stampin’ Dimensionals® to finish off the card.

Stamp Sets: Short & Sweet (retired), Timeless Textures

Ink: Ranger® Tim Holtz® Worn Lipstick, Festive Berries  Distress Stains; Gelatos®, Titanium White Acrylic Paint

Paper: Whisper White, Crumb Cake, Rose Red

Accessories: Clear Gesso®, Matte Gel, Big Shot™,  Bloomin’ Heart Thinlits™, Hexagon Punch, Pattern Heartwood Stencil (MB), Pearls, 5/8” Satin Ribbon


Thanks again for taking the time to visit- I hope you can gather your supplies and pick a style to create your own card for our gallery at The Card Concept!

Tuesday, February 2, 2016

SUO141 Happy Floral Birthday


Hi Friends!   

It’s time for the SUO141 “Happy Birthday” Challenge and I decided to create a Clean and Layered (CAL) card using the Create with Connieand Mary CCMC391 Sketch Challenge along with the FUSION “Woodgrain Neutral” Inspiration Photo Challenge (I was inspired by the blue and white along with the neutral colors :-)).

I hope you will have a chance to check out my sister Design Team member samples at the SU-Only Challenge site as well as the fantastic Design Team samples at the other two challenge sites- gorgeous inspiration from all!

To create this card:

Use the Big Shot™ with the Zig Zag Textured Impressions™ Embossing Folder to emboss a piece of Tip Top Taupe cardstock.

Trim the embossed panel and mount onto Whisper White cardstock, trim again and mount onto the Night of Navy card base.

Stamp the sentiment from Rose Wonder using Night of Navy Classic Ink onto Whisper White cardstock, trim and create a banner using the Hexagon Punch.

Add a strip of Night of Navy cardstock to the card base, adhere the loops of Gold Thread and mount the sentiment using Stampin’ Dimensionals®.

De-static a piece of Vellum with the Embossing Buddy®, ink the floral stamp from Flower Shop and the branch image from Choose Happiness using Versamark™ Ink and stamp three of the floral images and two of the branches onto the vellum.

Apply White Stampin’ Emboss® Embossing Powder and heat set with the Heat Tool. 
Color the images using Stampin' Write Markers- Marina Mist for the flowers and Wild Wasabi for the leaves.

Wipe off the excess ink from the embossing and carefully fussy cut the images.

Mount the leaves and flowers to the card front, add the Early Espresso buttons (with Night of Navy strips as “thread”) to finish off the card. 

Stamp Sets:  Rose Wonder, Flower Shop, Choose Happiness

Ink:  Versamark™, Night of Navy; Stampin' Write Markers- Marina Mist and Wild Wasabi
Paper/Cardstock: Whisper White, Night of Navy, Tip Top Taupe
Accessories: Big Shot™, Zig Zag Textured Impressions™ Embossing Folder, Embossing Buddy®, Stampin’ Emboss® White Embossing Powder, Heat Tool, Hexagon Punch, Gold Thread, retired Early Espresso buttons

Thanks again for stopping by and we hope to see your Stampin’ Up! Only project in our “Happy Birthday” Challenge gallery!

Monday, February 1, 2016

By The Tide- A Color, Sketch and Theme Challenge :-)


Hi Friends! 

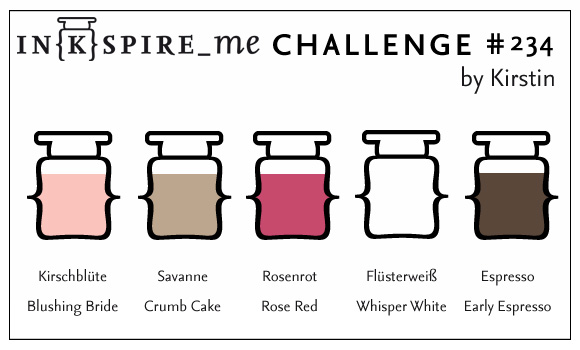
I hope you had a fabulous weekend!  I am sharing a card today that I created this morning using the Pals Paper Arts PPA285 Color Challenge along with the Freshly Made Sketches FMS221 Sketch Challenge and the Just Add Ink JAI296 "Just Add Nature" Challenge . 

If you have not had a chance to visit the above sites, I hope you will find time to do so- wonderful inspiration from all!

To create this card:

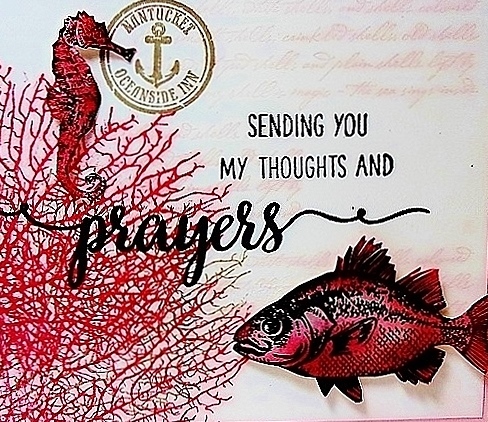
Ink the script stamp from By the Tide (Stampin’ Up!) with Pink Pirouette Classic Ink and stamp repeatedly onto a piece of Whisper White cardstock.

Ink the coral image using Tip Top Taupe Classic Ink and stamp into the corner of the panel, clean the stamp and ink the coral image again with Watermelon Wonder Classic Ink, stamp off onto a scrap piece of paper, stamp onto the panel and repeat with the coral image using Watermelon Wonder Classic Ink.

Ink the Nantucket image using Tip Top Taupe Classic Ink , ink the sentiment from Blessed (Mama Elephant) using Memento™ Tuxedo Black Ink and stamp onto the panel (I used my MISTI® Tool to position and stamp this image).

Trim the stamped panel and mount onto Pink Pirouette cardstock.
Trim a piece of Whisper White cardstock for the background panel, mount onto Pink Pirouette cardstock and mount onto the Tip Top Taupe card base.

It is difficult to see the beautiful sheen from the Wink of Stella
Ink the fish and seahorse images using Stāz-On® Jet Black Ink and stamp onto Whisper White cardstock.

Color the images with the AquaPainter™ and ink from the Pink Pirouette, Watermelon Wonder and Tip Top Taupe Classic Ink pads.
Fussy cut each image, add a bit of Clear Wink of Stella™ and mount the fussy cut images onto the stamped panel using Stampin’ Dimensionals®.

Add the focal image panel to the card front to finish off the card using Stampin’ Dimensionals® to finish off the card.

Stamp Sets:  By the Tide (Stampin’ Up!), Blessed (Mama Elephant)

Ink: Stāz-On® Jet Black, Memento™ Tuxedo Black, Pink Pirouette, Watermelon Wonder, Tip Top Taupe

Paper: Whisper White, Pink Pirouette, Tip Top Taupe

Accessories: Clear Wink of Stella™, MISTI® Too, Stampin’ Dimensionals®


Thanks again for stopping by!!  Tomorrow will be the start of the new SUO-Only Challenge and Wednesday the new Card Concept Challenge begins- hugs and have a blessed week, my friends!!
Related Posts Plugin for WordPress, Blogger...