Thursday, August 10, 2017

In All Things, Give Thanks


Hi Friends! 

I hope all of you are having a great week so far! Today I am sharing another Mixed Media card that I created using digital images from Power Poppy for a few online challenges. 

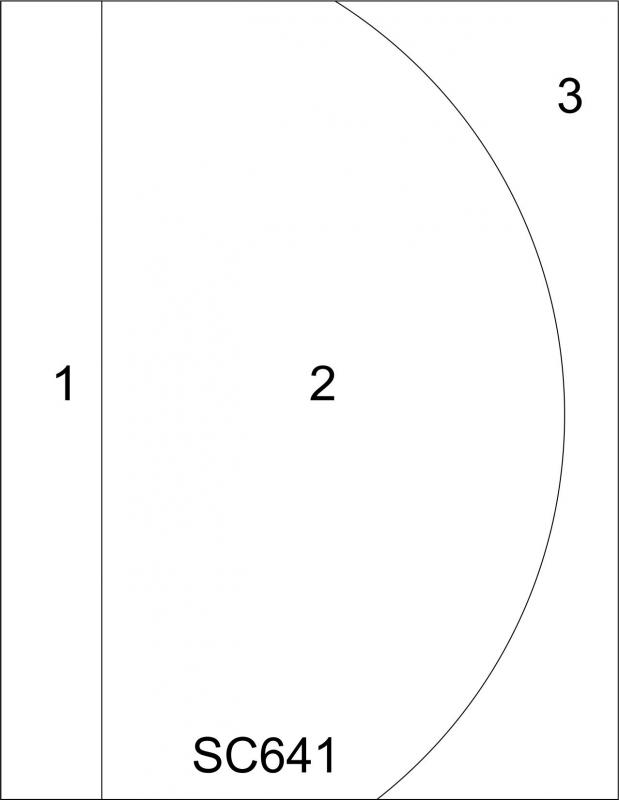
I wanted to participate with the Power Poppy August “Mix &Match” Challenge (I used two Power Poppy Digital Stamp Sets) along with the Litte Red Wagon #406 “Bugs & Slugs” Challenge, the Sunny Day Crafting  “F is forFlowers” Challenge and the Splitcoaststampers SC641 Sketch Challenge (I flipped the sketch).

If you have not had a chance to visit the challenge blogs yet, I encourage you to do so- gorgeous inspiration from all!

To create this card:

1). Using a photo editing software (I used the retired My Digital Studio™ from Stampin’ Up!) or Word, import the floral image from Pure Prairie Bouquet and the sentiment from Bittersweet Wreath (both Power Poppy), re-size and print out onto Whisper White cardstock.

2). Color the floral image using am AquaPainter™ (water brush) with Derwent® and Stampin’ Up! Watercolor Pencils, add a few shadows with Spectrum Noir™ Alcohol Markers (I used TB2, CT1, PL3) along with Stampin’ Write Markers- Daffodil Delight and Tip Top Taupe and fill in the sky with a Conté ά Paris™ Pastel #56 Pencil.  Add additional highlights with an Extra Fine White Sharpie® Paint Pen and use the Spectrum Noir™ Clear Glitter Pen to add shimmer to the butterfly. 

3).  Once you are satisfied with the coloring of the image, use the Big Shot™ with Sizzix™ Circle Framelits™ to cut out the image and cut out another circle (the same size) from Basic Black cardstock.

4). Trim a piece of Whisper White cardstock, mount onto a piece of Basic Black cardstock, trim and mount onto the white card base.

5). Layer the circle die cut with the Basic Black circle, trim off the side and mount onto the card front.

6). Use the Big Shot™ with the MFT Fishtail Flags STAX Dies to die cut the sentiment as well as a piece of Basic Black cardstock, trim the ends, layer together and mount onto the card front with dimensional foam.

7). Add the strip of Basic Black cardstock to the far right hand side with dimensional foam.

8). Use Nuvo™ Limoncello Crystal Jewel Drops to add a few accents and finish off the card.

Stamp Sets: Pure Prairie Bouquet, Bittersweet Wreath (Power Poppy- digital)

Ink/Mediums: Printer Ink- Black; Derwent™ and Stampin’ Up! Watercolor Pencils, Spectrum Noir™ Alcohol Markers- TB2, CT1, PL3; Stampin’ Write Markers- Daffodil Delight, Tip Top Taupe; Extra Fine White Sharpie® Paint Pen, Spectrum Noir™Clear Glitter Pen,  Nuvo™ Limoncello Jewel Drops

 Paper: Whisper White, Basic Black

Accessories/Tools: Big Shot™, Sizzix™ Circle Framelits™, NFT Fishtail Flags STAX Dies, AquaPainter™

Thanks again for taking the time to stop by and visit- hugs and I hope you have a wonderful week!

Wednesday, August 9, 2017

Happiness Is...A Little Bit of Coffee and a Whole Lot of Jesus

Hi Friends!

It’s time for the new SC657 Sketch Challenge at Splitcoaststampers and I just love this layout that Diane designed, don’t you? Perfect for so many occasions!

I decided to pull out a few brand new stamp sets from Verve Stamps, Fill Me Up and Happiness Is along with the coordinating Happiness In A Cup Dies and paired them with some of my retired designer series paper, ribbon and embellishments.  

I am still trying to make sure that I use my retired stash with new stamps so I can justify buying new “stuff”- it seems to be working for now :-)

I also am linking this card to the Word Art Wednesday #294-#295 “Anything Goes”Challenge as well as a few other Splitcoaststampers challenges.

If you have not had a chance to check out the above challenges yet, I hope you will find the time to do so- as always, gorgeous inspiration from all!

To create this card:

1). Ink the sentiment from Fill Me Up with Versafine™ Onyx Black Ink and stamp onto a piece of Whisper White cardstock.  Apply Clear Embossing Powder, heat set with the Heat Tool and once cooled, die cut with the MFT Stitched Square STAX Dies.  Mount onto a piece of Chocolate Chip cardstock and trim close to the die cut edge.

2). Die cut the cup images from Whisper White cardstock using the Happiness In A Cup Dies (Verve Stamps).  Ink the coordinating images from the Fill Me Up and Happiness Is stamp sets with Versafine™  Onyx Black Ink, heat set the ink and watercolor with Distress Ink and Stampin’ Write markers.

3). Trim the background panels from the retired Stampin’ Up! Parisian Breeze Specialty Designer Series Paper, mount onto Chocolate Chip cardstock and adhere the panels per the sketch to the white card base (I used dimensional foam for the sentiment panel).

4). Mount the colored die cut images with dimensional foam and add the ribbon bow with the wooden heart to the card front.

5). Use a clear glitter pen to add shimmer to the heart on the coffee cup as well as the lid and add a few Rhinestones to the hearts to finish off the card.

Stamp Sets: Fill Me Up, Happiness Is (Verve Stamps™)

Ink/Mediums: Versafine™ Onyx Black; Stampin’ Write Markers- Baja Breeze (retired), Sweet Sugarplum, Chocolate Chip, Crumb Cake; Clear Wink of Stella®, Tim Holtz™ Gathered Twigs Distress Ink

Paper: Whisper White, Chocolate Chip, retired Stampin’ Up! Specialty Designer Series Paper- Parisian Breeze

Accessories/Tools: Big Shot™, Verve Stamps™ Happiness In A Cup Dies, MFT Stitched Square Dies, Embossing Buddy®, Heat Tool, Stampin’ Emboss® Clear Embossing Powder, ½” Baja Breeze Seam Binding Ribbon (retired), Wooden Heart (retired SU!), Rhinestones


Thanks again for taking the time to visit- I hope all of you have a wonderful week!

Monday, August 7, 2017

Harvest Mouse- Wishing You A Harvest of Blessings

Hi Friends!

Today I am sharing a card designed with the Harvest Mouse stamp set from My Favorite Things™.  

I have owned this stamp set for quite a while but this is the first time I had a chance to create a card- I just love the sweet mouse images with the sentiments in this fun set, don’t you? 

I incorporated the MFT #344 Sketch Challenge along with The Paper Players #356 “TheGreat Outdoors” Challenge and the Just Add Ink #371 “Just Choose Two” into the design (I chose Pets and Designer Paper).  

Personally, I have two cats but mice are sometimes pets as well, right? Just not in my house- onfortunately, they would be "dinner" for my kitties :-) 

If you have not had a chance to check out the above challenges yet, I hope you will find the time to do so- fabulous inspiration from all!

To create this card:

1). Using the Big Shot™ with the MFT Blueprints #13 Die (stitched frame), die cut a piece of plaid designer paper with just the bottom portion of the die. 

2). Use the scalloped frame die from the MFT Blueprints 20 Die to die cut a piece of white cardstock.  Layer the two together and trim to fit the 4 ¼” x 5 ½” card base.

3). Trim the piece of coordinating designer paper to mount onto the gray card base and layer the designer series paper panel per the sketch.  Add a few vertical strips of scraps layered onto gray cardstock for the remainder of the sketch layout. 

4). Use the MFT Harvest Mouse dies to cut out pieces from white cardstock and stamp the coordinating MFT Harvest Mouse images using the Versafine™ Onyx Black Ink (heat with a heat tool).

5). Use a combination of alcohol and water-based markers to color the images.

6). Die cut the banner for the sentiment from white cardstock using the MFT Blueprints 20 Die, stamp the sentiment using Versafine™ Onyx Black Ink and heat set with a heat tool.  

7). Finish off the card by adding the button with the twine to the sentiment and layering all of the pieces onto the card front with dimensional foam.  For the eye, use a small pin to add a bit of Gloss Black Nuvo™ Crystal Drops.

Stamp Sets: Harvest Mouse (My Favorite Things™)

Ink/Mediums: Versafine™ Onyx Black; Stampin’ Write Markers- Garden Green, So Saffron, Pumpkin Pie, Pear Pizzazz; Spectrum Noir™ Alcohol Markers- BGR1, CT1, DG2; Nuvo™ Gloss Black Crystal Drops

Paper: Whisper White, Basic Gray, retired Stampin’ Up! Designer Series Paper- retired Murfield 

Accessories/Tools: Big Shot™, MFT Blueprints #20 and #13 Dies, Tangerine Tango button (retired SU!), misc. scrap twine


Thanks again for taking the time to stop by- hugs and I hope all of you have a great week!

Sunday, August 6, 2017

Faith, Hope and Love

Hi Friends!

I am sharing another fun card today created with the Prim Blessings Clear StampSet (designed by Diane Zechman) from Sweet ‘n Sassy Stamps.  


If you have not had a chance to visit the above challenge sites or SNSS Blog/FB Page yet, I encourage you to do so- wonderful inspiration from all!

To create this card:

1). On a piece of white cardstock, stamp the sunflower images from Prim Blessings with Versafine™ Onyx Black ink and heat emboss with clear embossing powder.  Watercolor the flowers with water-based markers and fussy-cut out each sunflower.

2). Layer the pieces of designer paper (per the sketch) onto suede cardstock, looping some knotted twine onto the one background panel.

3). Ink the sentiment from Prim Blessings with suede ink, stamp repeatedly onto a piece of light brown designer paper (offsetting the sentiment as you re-ink and stamp down the panel).

4). Add the stamped panel directly to the card front and the fussy-cut sunflowers with dimensional foam.

5). De-static a scrap piece of vanilla cardstock with an embossing powder tool, ink the sentiment from Prim Blessings with Versafine™ Onyx Black ink, heat emboss with clear embossing powder and once cooled, create the banner.  Color the little hearts on the sentiment banner with a cherry marker and use a suede marker for the hearts on the hand stamped panel.  Mount the sentiment banner to the card front with dimensional foam.

6). Use a clear glitter pen to add shimmer to the flower centers and petals and glossy accents all of the hearts to finish off the card.

Stamp Sets:  Prim Blessings (Sweet ‘n Sassy Stamps)

Ink/Mediums: Versafine™ Onyx Black, Stampin’ Write Markers- Crushed Curry, Cherry Cobbler, Soft Suede;  Spectrum Noir™ Clear Glitter Pen, Glossy Accents™

Paper/Cardstock: Whisper White, Very Vanilla, Soft Suede; Authentique™ Grace 6x6 Paper

Accessories/Tools: Embossing Buddy®, Clear Embossing Powder, Heat Tool, Twine


Thanks again for taking the time to stop by- hugs and I hope all of you have a fabulous week!  

Friday, August 4, 2017

Thoughts & Prayers- Nothing is Worth More than This Day

Hi Friends!!

Woohoo! I had a chance to create another Clean and Simple (CAS) Mixed Media card using an alcohol ink technique on vellum last night. One thing I forgot to do was work in a well ventilated room- lol! I must remember that for the next time :-)

I created this card for the August CAS Mixed-Media challenge and chose to use vellum versus Yupo® paper (I have the Yupo® as well as Glossy cardstock but neither one was in the area where I actually stamp right now, so I pulled out a piece of vellum instead) and the Simon Says Wednesday "Splatter It" Challenge.

My design style normally does not lean toward CAS cards but lately I have been trying to participate in CAS challenges and force myself to think CAS.  I am having so much fun with this style and who knows? I may be converted soon- lol!!

If you have not already had a chance to visit the above challenge sites yet, I hope you will do so- wonderful inspiration from their Design Teams as well as in their galleries!

OK, I have to admit, this card was an experiment so I did try a few different things ( I refused to give up :-)) :

1). Using alcohol inks for the “smoosh” technique (***Note- epic fail on vellum but it is part of this card ) place a few drops of Ranger® Adirondack™ Alcohol Inks- Ginger, Latte and Terra Cotta onto a silicone craft mat, spritz with alcohol blending solution and lay the piece of vellum into the ink. Immediately lift up the vellum, allow the inks to merge and blend.  The problem I had with this method on vellum was that I had too much of the ink on the mat (and too similar of colors) so the colors became one brown color (I decided to wipe it off the vellum and start over...)

2). Using  Spectrum Noir™ Alcohol Markers, color with the large flat nib back and forth over the panel- GB5 Yellow at the top, OR1 Orange in the center and the DG4 at the bottom. Once the marker has dried (only a few moments), spritz a bit of alcohol blending solution over the panel and allow that to dry.

3). Trim the vellum, de-static the alcohol marker ink side with an Embossing Buddy®, stamp the tree from Thoughts & Prayers using Versafine™ Onyx Black Ink, apply Clear Embossing Powder and carefully heat set with the Heat Tool.

4). Using the Big Shot™ with the MFT Stitched Rectangle STAX, cut the frame from Basic Black cardstock and adhere the vellum panel to the frame.  Mount the entire frame onto a piece of So Saffron cardstock (I had this piece in my stash already die cut with the same rectangle die).

5). On a piece of Whisper White cardstock, stamp the sentiment from the retired Summer Afternoon stamp set with Memento™ Tuxedo Black Ink at the bottom, trim the panel and mount onto a piece of Basic Black cardstock.  Adhere the entire background onto the white card base and add the vellum panel.

6). Die cut the cat from Basic Black cardstock with the Poppystamps™ Sitting Cat Die (I also had this die cut ready in my stash)- mount onto the card front with dimensional foam to finish off the card.

Stamp Sets: Thoughts & Prayers, Summer Afternoon (current and retired Stampin’ Up!)

Ink/Mediums: Versafine™ Onyx Black; Alcohol Inks, Spectrum Noir™ Alcohol Markers- GB5, OR1, DG4

Paper: Whisper White, Basic Black, Vellum

Accessories/Tools:  Big Shot™, MFT Stitched Rectangles STAX Dies, Poppystamps™ Sitting Cat Die, Embossing Buddy®, Stampin’ Emboss® Clear Embossing Powder, Heat Tool


Thanks again for stopping by- hugs and I hope all of you have a fabulous weekend!

Thursday, August 3, 2017

For the Birds


Hi Friends!!

I had a chance to create another Clean and Simple (CAS) Mixed Media card using the Stamplorations™ For the Birds Clear Stamp set along with the CAS(E) ThisSketch #233 Sketch Challenge along with the AAA Cards CAS Game #95 Rainbow and the Stamplorations™ Never Ending "Anything Goes" Challenge.

If you have not already had a chance to visit the above challenge sites, I hope you will do so- gorgeous examples from their Design Teams as well as in their galleries!

To create this card:

1). Die cut a piece of Whisper White cardstock using the Stitched Hillside Borders Die, trim the edges and mount onto a piece of Basic Black cardstock.

2). De-static the upper panel  with an Embossing Buddy®, stamp the sentiment from For The Birds with Versafine™ Onyx Black Ink, apply Clear Embossing Powder and heat set with the Heat Tool.

3). Mount the entire panel onto the white card base.

4). Ink the For the Birds image with Versafine™ Onyx Black Ink, apply Clear Embossing Powder and heat set with the Heat Tool.  Color the image using Zig® Clean Color Real Brush Markers, use an AquaPainter™ (water brush) to soften and blend the color, fussy cut and adhere to the card front with dimensional foam. Use a Spectrum Noir™ Clear Glitter Pen to add shimmer to the bird image.

5). Finish off the card with a few drops of Nuvo™ Jewel Drops- Rosewater, Pale Periwinkle and Orange Marmalade.

Stamp Sets: For the Birds (Stamplorations™)

Ink/Mediums: Versafine™ Onyx Black; Zig® Clean Color Real Brush Markers- Yellow, Orange, Blue, Light Green, Light Violet; Nuvo™ Jewel Drops- Rosewater, Pale Periwinkle, Orange Marmalade; Spectrum Noir™ Clear Glitter Pen

Paper: Whisper White, Basic Black

Accessories/Tools:  Big Shot™, MFT Stitched Hillside Borders Dies, Embossing Buddy®, Stampin’ Emboss® Clear Embossing Powder, Heat Tool, AquaPainter™ 

Thanks again for visiting- hugs and I hope all of you have a wonderful weekend!

Love You More

Hi Friends!

I have been busy this summer trying to organizing my stamping studio and have decided to focus on using some of my older stamps and paper this year (I believe I could create a card every day for years using a different stamp set and still not use all of my stamps :-)). 

I wanted to take a break this evening and decided to pull out the retired Stampin’ Up! Love You More stamp set along with the retired I Am Me designer series paper.  I paired the two with the current Work of Art stamp set to create a quick Clean and Simple (CAS) card.   

Clean and Simple cards are still difficult for me (I tend to be a more Shabby Chic/Mixed Media artist) so to focus my design process, I incorporated the CAS(E) This Sketch #232 Sketch Challenge along with the #93  Keyword Challenge at The Challenge (Simple, Friendship) into the design. 

Since I have a large selection of stamp sets (most of which are retired Stampin' Up!), I find that online challenges help me limit my choices and at least finish a card:-)).  

If you have not had a chance to check out the above challenges yet, I hope you will find the time to do so- great inspiration from all!

This was a very simple card to create:

1). Trim a piece of Whisper White cardstock to approx. 4” x 5 ¼”, mount onto a piece of Basic Gray cardstock, trim close to the edge and mount onto a piece of Real Red cardstock.

2). De-static a scrap piece of Whisper White cardstock with an Embossing Buddy®, stamp the globe image with Versafine™ Onyx Black ink and heat emboss with clear embossing powder.  Once the powder has cooled, color the heart with the Real Red Stampin’ Wrtie Marker and the ocean with the Pool Party Marker.  Fussy-cut the image and use a clear glitter pen to add shimmer to the ocean.

3). Cut a piece of the I Am Me patterned paper, layer onto Basic Gray cardstock and again  onto Real Red cardstock. 

4). Ink the chevron stamp from Work of Art with Pool Party Classic Ink, stamp on an angle onto the card front several times before adhering the layered designer paper panel.  Trim the panel to the edges of the card front and mount the entire card front onto the Extra Thick Whisper White card base.

5). Ink the sentiment from Love You More with Versafine™ Onyx Black ink and heat emboss with clear embossing powder.

6). Mount the fussy cut globe image with dimensional foam onto the card front.

7). Finish off the card by adding a few accents with Nuvo™ Crystal Glossy Black Drops.

Stamp Sets: Love You More, Work of Art

Ink/Mediums: Versafine™ Onyx Black, Pool Party Classic Ink; Stampin’ Write Markers- Pool Party, Real Red; Clear Wink of Stella®

Paper: Whisper White, Basic Gray, Real Red, retired I AM Me DSP

Accessories/Tools: Embossing Buddy®, Clear EP, Heat Tool


Thanks again for taking the time to stop by- hugs and I hope all of you have a wonderful week!

Tuesday, August 1, 2017

SUO180 Celebrate- Another Watercolor Tissue Paper Experiment


Hi Friends!   


I have a few birthdays to celebrate in the fall and I decided to play around with the watercolor tissue technique again this time using fall colors (see this post for more details on the technique).

I also will be linking this card to The Paper Players #355Tic-Tac-Toe Challenge (Die-Cut, Banner, Birthday) and the Word Art Wednesday#292-#293 “Anything Goes” Challenge.

If you have not had a chance to stop by the SU-Only Challengesite to check out the rest of the Design Team projects or the other challenge sites yet, I encourage you to do so- wonderful inspiration from all!

To create this card:

1). Using a silicone craft mat, tap the So Saffron, Cajun Craze and Pumpkin Pie Classic Ink pads, lightly spritz with water, use a plastic spoon or palette knife to stir the ink a bit and lay a piece of tissue paper into the ink.  Gently lift up the paper and use the Heat Tool to dry the sheet.  Apply additional ink as needed and once you are satisfied with the results and the panel is thoroughly dried, adhere to a piece of Whisper White cardstock, “scrunching” up the tissue as you adhere it to the Whisper White panel.

2). Once the glue has dried, rub a Versamark™ ink pad over the ridges, apply Gold Stampin’ Emboss® Embossing Powder and heat set with the Heat Tool.

3). Use the Big Shot™ with the Leaflets Framelits™ to cut out the leaf.  Ink the corresponding stamp from Vintage Leaves with Cajun Craze Classic Ink, stamp over the entire leaf (difficult to see in the photo), gently wipe off the ink with a dry paper towel from the embossing and set aside.

Close-up of the Watercolor Tissue Detail
4). Use the Big Shot™ with the Woodland Textured Impressions™ Embossing Folder to emboss a piece of Very Vanilla cardstock, trim the panel, mount onto a piece of Cajun Craze cardstock and adhere to the Extra Thick Whisper White card base.

5). Loop a bit of Gold Metallic Thread onto the card front and add the die cut leaf with Stampin’ Dimensionals®.

6). Heat emboss the sentiment from Beautiful You with Gold Embossing Powder, hand cut the banner points and mount onto the card front with Stampin’ Dimensionals®.

7). Use Clear Wink of Stella® to add shimmer to the birch trees in the background to finish off the card.

Stamp Sets: Beautiful You, Vintage Leaves

Ink/Mediums: Versamark™, Classic Ink- Cajun Craze, Pumpkin Pie, So Saffron; Clear Wink of Stella®
Paper: Very Vanilla, Cajun Craze, Extra Thick Whisper White; Wrapping Tissue Paper
Accessories/Tools: Big Shot™, Leaflets Framelits™, Woodland Textured Impressions™ Embossing Folder, Embossing Buddy®, Stampin’ Emboss® Gold Embossing Powder , Heat Tool, Gold Metallic Thread

Thanks again for taking the time to visit and I hope that you will create your own Stampin’ Up! Only project and play along with our “Birthday Celebrations” challenge!
Related Posts Plugin for WordPress, Blogger...
