Showing posts with label Off The Grid. Show all posts

Tuesday, July 18, 2017

The Heavens Declare The Glory of God


Hi Friends!!

I am so excited to announce that I am the Guest Designer for the Retro RubberChallenge Blog #67 “Over the Rainbow” Challenge!  

A few weeks ago, my card was chosen as their winner and one of the perks of winning is that you are invited to be a Guest Designer on a future challenge- what a wonderful honor!

I decided to create a colorful simple Mixed Media card using a verse sentiment from the current Our Daily Bread Designs Scripture 9 stamp set along with retired Stampin’ Up! sets- Off the Grid, Stipple Butterfly and Notable Notions.  All of these stamps are several years old and I absolutely loved having a chance to play around with them again!


If you have not already had a chance to visit the above challenge sites, I hope you will do so- they all have wonderful Design Teams as well as gorgeous inspiration in their galleries.

To create this card:

1). Ink the Stipple Butterfly image with Versafine™ Onyx Black ink, stamp onto a piece of white cardstock paper, apply clear embossing powder and heat set with the Heat Tool.

2). Using Zig® Clean Real Color Markers along with an AquaPainter™, watercolor the butterfly image and fussy-cut the image.  Add a few white highlights to the wings with the Sharpie® Extra Fine White Paint Pen.

3). On a piece of Strathmore™ Bristol Smooth Paper, use the same Zig® Clean Real Color Markers, add a bit of color, spritz with water and dry with the Heat Tool. Splash a bit of water onto the panel, let the water absorb before lifting with a paper towel and heat with the Heat Tool. 
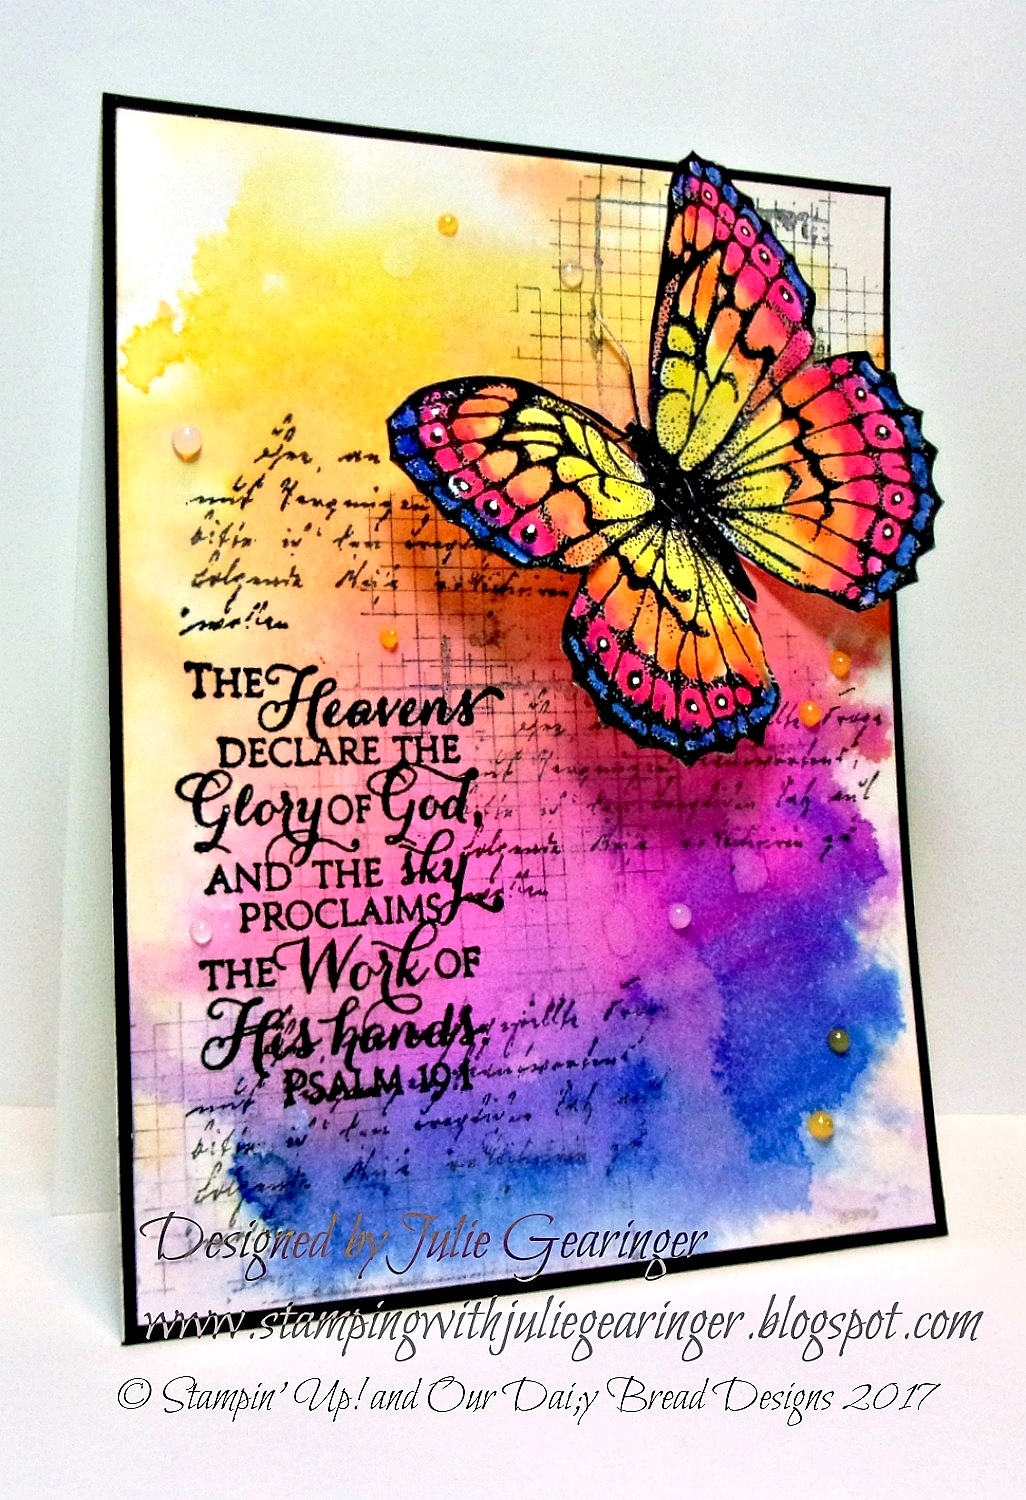
4). Trim the panel, ink the retired Off the Grid background stamp with Hickory Smoke Distress Ink over the background as well as the retired Notable Notions script image.

5). Stamp the sentiment from Scripture Collection 9 with archival black ink and heat set with the Heat Tool.

6). Trim the panel and mount onto a piece of black cardstock, trim once more and mount onto the white card base.

7). Mount the fussy cut butterfly to the corner and add a few drops of Nuvo™ Rosewater and Orange Marmalade Jewel Drops to finish off the card.

 Stamp Sets: Scripture Collection 9 (Our Daily Bread Designs); Stipple Butterfly, Off the Grid, Notable Notions (all retired Stampin’ Up!)

Ink/Mediums: Versafine™ Onyx Black Ink, Zig® Clean Color Real Brush Markers- Yellow, Orange, Blue, Pink;  Nuvo™ Jewel Drops- Rosewater, Orange Marmalade; Sharpie® Extra Fine White Paint Pen

Paper: Bristol Smooth, Basic Black, Whisper White

Accessories:  AquaPainter™, Heat Tool

Thanks again for visiting- I hope you will find some time to pull out some of your older stamps and join us at Retro Rubber Challenge Blog! Hugs and please stop by again soon!

Wednesday, June 10, 2015

TCC37 Mixed Media Butterfly Dreams :-)


Hi Stampers!!


I just love all of the ombre butterflies in this photo and used that as my inspiration for the background on my Mixed Media card :-)

I combined our Card Concept challenge with the Mixed Media Monthly Challenge MMMC#13 "A Year of Choices" and chose  MMMC#7 Tic-Tac-Toe (Die Cuts or Punch, Stamps and Ribbon) for my card.

The Card Concept is a bi-weekly challenge that has an inspiration photo along with a number of design styles that you can choose from to create your card- Clean and Simple, Clean and Graphic, Clean and Layered, Shabby Chic, Freestyle Collage, Classy and Elegant and Mixed Media.   

Hope you can find some time to gather your supplies together and come join in on the fun!! 

To create this card:

Apply Gesso® to a piece of Whisper White cardstock and set aside to dry.

Once dried, apply Faber-Castell® Gelatos™ to the paper, spritz with water a bit, rub with your fingers and repeat until the desired color is achieved.

Once dried- de-static the paper with an Embossing Buddy® ,  stamp the Off The Grid stamp using Versamark™ Ink, apply Stampin’  Emboss White Embossing Powder and heat with the Heat Tool.

Trim the background panel, adhere to a piece of Basic Black cardstock, trim again and mount onto a piece of Tempting Turquoise cardstock.

Ink the floral stems from World of Dreams using Stāz-On® Jet Black Ink and stamp twice onto a piece of acrylic (I used an upcycled clear mount stamp cover sheet that I had trimmed to the size of the Gesso® background panel).   There is a bit of a "blur"  on the images stamped on the acrylic in the photo...since they are raised from the background, it was a bit difficult to photograph and not get too much sheen :-)

Ink the sentiment from Choose Happiness with Stāz-On® Jet Black Ink and stamp near the bottom of the acrylic sheet.

Use a bit of glue to mount the acrylic panel to the background – I put the adhesive in the area where the ribbon would be mounted :-)

Slide the retired Stylish Silver Hodgepodge Hardware Ribbon Slide onto a piece of 1” Black Satin Ribbon and mount onto the card front (wrapping the ends behind the panel).

Mount the entire panel onto the Whisper White card base
Stamp the butterflies onto Whisper White cardstock using Stāz-On® Jet Black Ink and use an AquaPainter™ with Pink Pirouette and Elegant Eggplant Classic Ink to watercolor the butterflies.

Punch the butterflies out with the Elegant Butterfly Punch and use a foam brush to apply Mod Podge® over the wings.

Allow to dry and mount the butterflies to the card front using Hot Glue.

Add the Pearls to the butterfly centers to finish off the card.

Stamp Sets:  World of Dreams, Choose Happiness, Papillon Potpourri, Off the Grid

Ink: Stāz-On® Jet Black, Versamark™; Stampin’ Up! Classic Ink- Pink Pirouette, Elegant Eggplant

Paper: Whisper White, Basic Black, Tempting Turquoise

Accessories: Gesso®, Faber-Castell® Gelatos™, Embossing Buddy®, Stampin’  Emboss® White Embossing Powder, Heat Tool, acrylic packaging, retired Stylish Silver Hodgepodge Hardware, 1” Black Satin Ribbon , Pearls


Thanks again for stopping by- I hope you have a wonderful week and come play along!

Monday, September 15, 2014

Thinking Of You- Fun Leaves with a Sketch and Color Challenge :-)

Hi Again Stampers!

Here is another card that I created last night using some of my retired stamps along with Gorgeous Grunge for the Pals Paper Arts PPA219 Color Challenge as well as the Friday Mashup! FM177 Special Guest Challenge.

Again, if you have not had a chance to check out both sites yet, I would encourage you to do so- great inspiration from all (including Heidi’s 7 year old daughter at The Friday Mashup! created the sketch- love it so I just had to "Mash It Up" this week :-))!!

To create this card:

Using the Embossing Buddy®, de-static a piece of Always Artichoke, Cajun Craze, Crushed Curry and Whisper White cardstock.

Ink the Magnificent Maple leaf using Versamark™ ink and stamp onto the Cajun Craze, Crushed Curry and Always Artichoke cardstock.  Apply Stampin’ Emboss® Gold Embossing Powder and heat with the Heat Tool.  

Ink the Off the Grid stamp along with the sentiment using Versamark™ ink and stamp onto the Whisper White cardstock.   Apply Stampin’ Emboss® Gold Embossing Powder and heat with the Heat Tool.  

Stamp the Gorgeous Grunge images using Classic Ink- Always Artichoke, Cajun Craze and Crushed Curry.  Trim the panel and mount onto a piece of Cajun Craze cardstock, trim again and mount onto the Always Artichoke card base.

Carefully “fussy cut” each leaf out around the embossed image- mount onto the card front to finish off the card.

Another quick and simple project!

Stamp Sets: Gorgeous Grunge (current), Magnificent Maple, Off the Grid, All Year Cheer I (all retired)

Ink: Versamark™, Always Artichoke, Cajun Craze, Crushed Curry

Paper/Cardstock:  Whisper White, Always Artichoke, Cajun Craze, Crushed Curry

Accessories:  Embossing Buddy®, Stampin’ Emboss® Gold Embossing Powder, Heat Tool


Thanks again for visiting- I will be sharing another card along with a few pages of the Bible Verse Memory Album shortly- hope you have a chance to stop by again soon!

Saturday, April 5, 2014

DD97 Butterfly Birthday - Three Challenges in One!


Hi Stampers! 

Time for the new DD97 “Bold and Sassy” Challenge- Melon Mambo and Tempting Turquoise and I decided to use a Butterfly Theme for The CardConcept #7 Challenge as well as added Pearls to this birthday card for the Seize the Birthday Challenge.  The Card Concept encourages you to try different styles and I believe this would be the Elegant Style since it has all of the pearls :-)


If you have not already taken the time to visit each of the challenge sites, I hope that you will find the time to do so – the Design Team projects at all three sites are fabulous as well as the rest of the entries!

To create this card:

Ink the En Francais background stamp using Tempting Turquoise Classic Ink and stamp onto a piece of Tempting Turquoise cardstock.  Add the scrap piece of lace from the Artisan Embellishment kit to the lower right along with a piece of 5/8” Basic Black Satin Ribbon and mount the panel onto the Basic Black card base.

Add the embossed Melon Mambo panel (from my scraps- previously embossed with the retired Lacy Brocade Textured Impressions™ Embossing Folder and mounted onto Basic Black cardstock).
  
Add another scrap piece of lace and satin ribbon to the Melon Mambo panel and adhere to the card front.  Add the strands of Pearls to the top and bottom edge of the ribbon.
Adhere the DSP panel to a piece of Basic Black cardstock and mount onto the card using Stampin’ Dimensionals®. 

Stamp the sentiment using Basic Black Classic Ink onto Whisper White cardstock and color with the Tempting Turquoise Stampin’ Write marker.  Ink the Off the Grid stamp using Crumb Cake Classic Ink and stamp over the sentiment.  Using a Sponge Dauber apply Crumb Cake Classic Ink to “antique” the paper  :-)

“Huff” onto the En Francais background stamp to re-moisten the Tempting Turquoise Classic Ink and lightly rub onto the sentiment layer, trim the sentiment and round the corners using the 1 ¼” Circle Punch.  Layer the sentiment onto a piece of Basic Black cardstock, trim and round the corners to match the sentiment using the 1 ¼” Circle Punch.
Mount the sentiment to the front of the card and add the Pearls to the sentiment and corners to finish off the card.
   
Stamp Sets:  En Francais, Botanical Tea (Graphic45- Hampton Arts)
Ink: Tempting Turquoise, Crumb Cake, Basic Black, Stampin’ Write Marker- Tempting Turquoise
Paper/Cardstock:  Melon Mambo, Tempting Turquoise,  Basic Black, Graphic45 Botanical Tea
Accessories: Big Shot™, retired Lacy Brocade Textured Impressions™ Embossing Folder, 1 ¼” Circle Punch, Sponge Dauber, retired Artisans Embellishment lace, retired 5/8” Basic Black Satin Ribbon, Pearls

I hope that you can create a project of your own using this week’s DD97 colors - we would love to have you join us!!


Thanks again for taking the time to stop by- have a wonderful weekend

Tuesday, April 1, 2014

PPA197 Go in the Direction of Your Dreams

Hi Stampers!

I hope all of you are having a great week so far!  I have been busy preparing for an upcoming Demo meeting with my upline and fellow Demonstrators so I have not been able to share any creations yet but decided to create a quick card using the Pals Paper Arts PPA197 Sketch along with Designer Series Paper (DSP) along with another homemade map from My Digital Studio (MDS).

I hope you have the time to stop by the Pals Paper Arts site- great inspiration from the Design Team as well as the other entries!

To create this card:

Using My Digital Studio (MDS), position the images onto an 8.5x11 blank page and print out.  I used the World Map stamp brush image (I reduced the size) as well as the sentiment from Word Play stamp brush set.  One thing that I love about MDS for cards- the images may be retired in the rubber stamp catalog but are still current in MDS :-)

Color the map using AquaPainter™ and Pool Party Classic Ink for the water, Gumball Green and Crumb Cake Classic Ink for the land masses.  Trim and mount onto a piece of Early Espresso cardstock.

Add a piece of Soho Subway DSP onto the Early Espresso card base.  

Adhere a piece of Epic Day This and That DSP onto Early Espresso cardstock for the second diagonal layer on the card front and add the Naturals Button with Natural Linen Thread.  Mount this onto the card front on an angle per the sketch. 
  
Layer the 1 ¼” Burlap Ribbon onto the card front overlapping the diagonal layer with the button at the bottom.  Add a few pieces of Natural Linen Thread knotted on the one side over the burlap ribbon.

Add the map image to the card front using Stampin’ Dimensionals®.

Adhere the sentiment to a piece of Early Espresso cardstock, trim and stamp with Off the Grid using Crumb Cake Classic Ink.  Use a Sponge Dauber to add additional Crumb Cake Classic Ink to tone down the white of the paper and adhere the knotted Natural Linen Thread to the corners and add to the front of the map/burlap using Stampin’ Dimensionals® to finish off the card. 

Stamp Sets:  World Map, Word Play (both MDS versions), Off the Grid

Ink: Printer Ink- Black, Crumb Cake, Gumball Green, Pool Party Classic Ink

Paper:  Whisper White, Early Espresso, Epic Day This and That DSP, Soho Subway DSP

Accessories:  AquaPainter™, Natural Linen Thread, 1 ¼” Burlap Ribbon, Naturals Button, Sponge Dauber


Thanks again for stopping by- I hope you have a wonderful week!

Monday, March 3, 2014

Floral Butterfly Card- Five Stamps and Four Punches


Hi Stampers! 


Again, if you have not already visited their sites,  I hope you will find the time to do so since inspiration truly abounds!

I decided to get back to basics a bit with this card- watercolor, sponging, punching and tearing (did not even use the Big Shot™ at all :-))

To create this card:

Use the  AquaPainter™ to apply a light coat of Rose Red Classic Ink onto a piece of Whisper White cardstock in a random sweep pattern.  Allow to dry and stamp the Off the Grid and Gorgeous Grunge stamps using Midnight Muse Classic Ink.

Stamp a few flowers from Petite Petals using Midnight Muse Classic Ink and create a mask for the flowers using cardstock or a sticky note.  Mask the first flower, re-ink the stampo with Midnight Muse Classic Ink and stamp the second flower, re-mask, re-ink and continue to add flowers to the background.

Tear the edge of the paper on a diagonal and use a Sponge Dauber to add Midnight Muse Classic Ink to the edges.   Adhere to a piece of Whisper White cardstock approx. 4” x 5 ¼”.  

Stamp the sentiment from Love and Sympathy in the corner using Midnight Muse Classic Ink and stamp the Petite Petals (do not re-ink the flower stamp, just huff to re-moisten the ink from the step above, stamp the first flower, mask and stamp again).  

Add a bit of Rose Red ink to the edge using a Sponge Dauber and mount the entire panel onto a piece of Rose Red cardstock and again onto the Midnight Muse card base.

Stamp the butterfly image from Papillon Potpourri three times onto Whisper White cardstock , punch out using the Elegant Butterfly Punch and adhere to the card front.

Create the paper bow using the Large Oval Punch- punch two Large Ovals from Midnight Muse cardstock, curl with the Bone Folder, adhere to create the bow loops, add to a scrap strip of Midnight Muse cardstock and add the two tails (banner points created with the Hexagon Punch). 


Stamp an additional flower using the Petite Petals stamp with Midnight Muse Classic Ink onto Whisper White cardstock, punch out using the Petite Petals Punch and adhere to the center of the paper bow. 

Add Pearls to the center of the flowers and butterflies to finish off the card.

Stamp Sets: Papillon Potpourri, Petite Petals, Off the Grid, Gorgeous Grunge, Love and Sympathy

Ink: Midnight Muse, Rose Red

Paper/Cardstock:  Whisper White, Midnight Muse, Rose Red

Accessories: AquaPainter™, Sponge Daubers, Punches- Petite Petal, Elegant Butterfly, Large Oval, Hexagon (for banner), Pearls


Thanks again for stopping by- I hope all of you have a marvelous Monday!

Sunday, February 9, 2014

Vintage Old World Map- Handmade Map for Masculine Birthday :-)


Hi Stampers! 

I wanted to create a masculine birthday card to have on hand for my stash and decided to use the Nacho Average Challenges NAC75 Sketch and since it is a birthday card, it qualifies again for the Seize the BirthdayAnything Goes Challenge :-)

Again, I hope that you have had a chance to check out both sites- wonderful examples and inspiration from all!

I was able to utitilze scraps and a previously printed image from My Digital Studio (MDS) for this "hybrid" card (again, when I print in MDS, I fill up the page prior to printing and use the other images at a later date- the map was one of the "other" images from a previous print :-)).

To create this card:

In My Digital Studio (MDS), open a blank 8.5 x 11 custom page and insert the Old World Map image- I have this stamp set but again, since I already had this image printed and ready to go so decided to use it…

Print out onto Whisper White cardstock and color the map using Stampin’ Write markers in Pool Party, Pistachio Pudding and use the AquaPainter™ with ink from both of the corresponding Classic Ink Pads to fill in the areas. 

To antique the map, use the AquaPainter™ with the retired Tea Stain Vintage Stampin’ Ink (I dilute this ink by placing a drop in the lid of the Crumb Cake Classic Ink pad and add a bit of water). 

Cut the image into thirds (per the sketch), distress the edges with the Distressing Tool, hand tear at the top and bottom of the outer layers of the map to shorten them (again, per the sketch) and apply Baked Brown Sugar Classic Ink to the distressed edges using a Sponge Dauber.   Adhere to strips of Early Espresso cardstock and distress the edges (again, with the Distressing Tool and by hand). 

Distress a piece of Epic Day Designer Series Paper (DSP) by stamping the Off The Grid along with Gorgeous Grunge (splatter stamp and diagonal line stamp) using Baked Brown Sugar Classic Ink.  Lightly distress the edges with the Distressing Tool and sponge Baked Brown Sugar to hide the white core).

Mount the map to the DSP layer using Stampin’ Dimensionals® for the outer edges and adhere the entire panel onto a piece of Early Espresso cardstock. 

Stamp the sentiment and the compass image using Basic Black Ink, “antique” with the diluted Tea Stain Vintage Ink , the Gorgeous Grunge stamps with Baked Brown Sugar Classic Ink, Stampin’ Write markers for the compass and mount both onto Early Espress cardstock (use the Hexagon Punch to create the banner and the 1 3/8” Circle Punch to punch out the compass image before layering the Early Espresso cardstock pieces behind the compass/banner). 

Add the Vintage Trinket brad to the center of the compass and the knotted Hemp Twine (retired) to the edge of the banner and top corner of the card front. Adhere the entire panel to a Whisper White or card base of your choice to finish off the card.   

Stamp Sets:  Old World Map- MDS version, Gorgeous Grunge, The Open Sea, Express Yourself, Off the Grid

Ink: Printer Ink- Black, Classic Ink- Basic Black, Baked Brown Sugar, Pistachio Pudding, Pool Party; Stampin’ Write markers- Pistachio Pudding, Pool Party, Sahara Sand, retired Tea Stain Vintage Ink

Paper: Whisper White, Early Espresso, Epic Day DSP

Accessories: AquaPainter™, Sponge Dauber, Punches- 1 3/8” Circle, Hexagon; Vintage Trinket (brad), retired Hemp Twine, Distressing Tool


Thanks again for stopping by!  Hope you have a fantastic weekend- God Bless!

Saturday, January 18, 2014

"Love is in the Air" - Two Challenges in One


Hi Stampers! 

This week’s DD86 “Subtly Yours” Dynamic Duo Challenge combines Pool Party with Pink Pirouette.  

This color combination reminded me of "romance" and with Valentine’s Day approaching, I decided to create a vintage “shabby Chic” card using the Stampin’ RoyaltySR210 Challenge Photo for inspiration.  


I hope that you will stop by and check out the rest of the Dynamic Duos Design Team projects and create a project of your own using this week’s colors - we would love to have you join us!!


To create this card:

Ink the background stamp, En Francais using Crumb Cake Classic Ink and stamp onto a piece of Very Vanilla cardstock. Add additional accents using the Best of Shelli stamp set inked with Pool Party Classic Ink and distress with the Distressing Tool.   Apply Crumb Cake Classic Ink using a Sponge Dauber and adhere to a piece of Crumb Cake cardstock.

On a piece of Etcetera Designer Series Paper (DSP), stamp the splatter stamp, Off the Grid background and the line stamp from Gorgeous Grunge using Pink Pirouette Classic Ink.  Distress the edges using the Distressing Tool and apply Crumb Cake Classic Ink to the edges. Tear the edge diagonally and adhere to the distressed Very Vanilla background.

Distress the piece of Fan Fair DSP (the pink advertisement with the lacy edge) and sponge Crumb Cake Classic Ink over the edges.  Adhere to the card front using Stampin’ Dimensionals®. 

Punch the scalloped circles from Pink Pirouette cardstock using Scallop Circle Punches- the two larger flowers are created with the 2 3/8” Scallop Circle Punch and three smaller flowers with the 1 ¾”,  Scallop Circle Punch. 

Use the retired Crimper Tool to crimp the paper (or you can just scrunch it up by hand to break up the fibers) and use the Bone Folder to curve the scalloped edge a bit before proceeding to the next step. 
Once you feel the flower is “distressed” enough, manually spiral cut from the outside edge of the scallop toward the center.   Start to roll the flower from the outside and roll the spiral tightly toward the center.  Apply Multi-Purpose Adhesive to the center piece to hold the flower in shape or you can use a Hot Glue Gun- here is a writtentutorial at Splitcoaststampers to show the basic idea.   Once all of your flowers are created, lightly sponge Crumb Cake Classic Ink onto the edges to distress a bit more.
Use the Bird Builder Punch to punch out the leaves from Crumb Cake Cardstock and create a triple bow using the ½” Pool Party Seam Binding Ribbon.
Adhere the flowers, leaves and ribbon bow to the card front (I continued to use the Hot Glue Gun but you could use Mini Glue Dots).   Add the Antique Brad to the center of the bow.
Adhere a piece of lace scrap to the back of the Love tag (both were from the retired Artisan Embellishment Kit).   Stamp the With Love sentiment from Field Flowers using Crumb Cake Classic Ink onto Very Vanilla cardstock, trim and punch the banner points using the Hexagon Punch.  Lightly sponge Crumb Cake Classic Ink along the edges.
Add the sentiment banner and embellished Love Tag to the card front using Stampin’ Dimensionals®.   Add the Pearls to the tag, banner and lower corner to finish off the card.   
Stamp Sets: Best of Shelli, En Francais, Field Flowers, Gorgeous Grunge, Off the Grid
Ink: Pink Pirouette, Pool Party, Crumb Cake
Paper/Cardstock:  Very Vanilla, Crumb Cake, Designer Series Paper- Etcetera, retired Fan Fair
Accessories: Punches- Scallop Circle 2 ¾” and  1 ¾”, Bird Builder, Hexagon; Sponge Dauber, ½” Pool Party Seam Binding Ribbon, Antique Brad, Stampin’ Dimensionals™, Hot Glue Gun (optional)
Since the flowers are dimensional on this card, I would most likely recommend hand delivery or mailing in a padded envelope with tissue paper wrapped around the card to protect the flowers.   

Thanks again for visiting- I hope you will find the time to join us at the Dynamic Duos this week! 
Related Posts Plugin for WordPress, Blogger...